
Grinding isn't easy, it's monotonous and will break you down, but, grinding well can save you a lot of time, here's some tips on grinding.
Preparation Is Key!
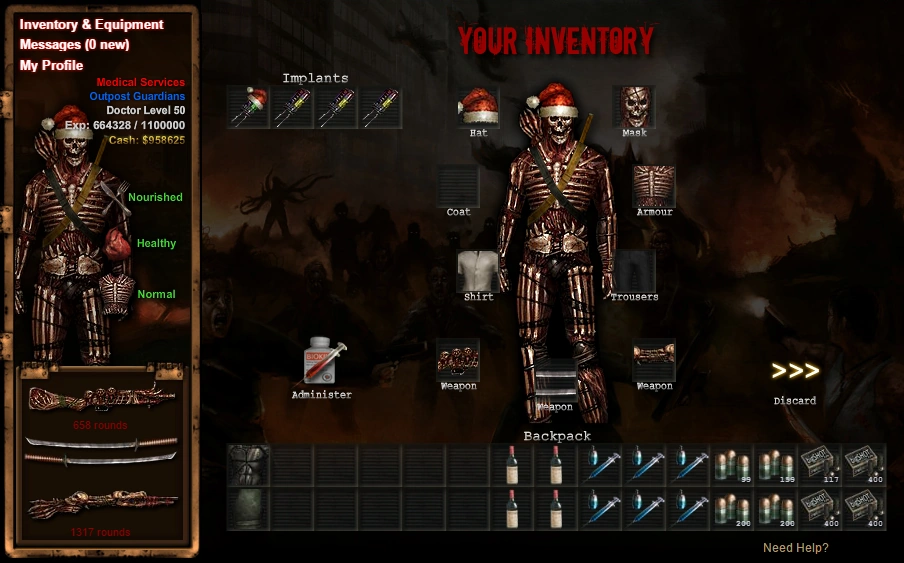
When we're going out for a grind run, you want to ensure that you're prepared! The number one thing that people don't think about is what to bring with them when they're in long cycles of a grind. So let's take boss cycles for example. Boss cycles last approximately one hour and during that hour, I assure you, you'll be hit. Most people are hit at least one time during the duration of an hour and having the right equipment could mean the difference between staying and finishing the cycle, retrieving your sweet loot, and possibly leveling up, or a long, shameful walk back. It might even save your life! That All Time Top Survivor Score won't build itself! In the above picture, you see an example of a player whom is prepared for a long, luxurious, and rewarding grinding session. Plenty of whiskeys for drinking, and plenty of neros for healing. They even have some spare armors and a rifle in case things get intense.
Woah, woah, I don't have all of these Items! What do I do!?!
That's the beauty of grinding! Any level player can do it, here, let's take a look at another example of a lower level player. Here you'll see that this level fifty player has relatively the same setup as the level two hundred and seventy-nine above. This player has prepared by bringing their Red Wine and Nerotonin-2, appropriate to their level. As you can see, there is a commonality between the two, that being Food, Medication, and spare Armour. Basically grinding, at any level, requires all of the same things.The philosophy behind these ideals is that you learn the basics of preparation before you learn the tactics to grinding, which we will be teaching here, soon.
Basically any items you bring will depend on what you're doing. Let's say you're starting your own Aggro, you may need a few more bullets for that, as you've got to round the block shooting to get it going. Spare armors, food, and medical supplies are also needed.
So what if we're just doing a basic Boss Cycle? Well if we're doing a Boss Cycle, we'll need plenty of Ammunition, due to the Boss Cycle being an hour long, and definitely food and medical supplies to last you the entire hour. You lose around thirty percent nutrition every forty-five minutes, or best calculated by our top grinders.

Outpost Attacks are a lot simpler. Your Outpost is under attack, Mate! Get out there and shoot some zombies. Alright so an Outpost Attack is roughly thirty minutes long, this being said, you'll probably only need one food item and a few medical supplies, some back up armors, and as much ammo as you can cram in your [Iinventory]]. That's it! That's all you need.
So What About Implants?
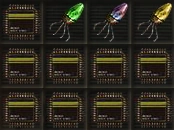
Alright so you've worked hard, grinded, leveled up, you're able to use Implants, and you're clueless on where to go with them. Well that's what we're here for! Now of course we'll be sticking to the Implants that will help you on your grind. That being experience, perception, violence, destruction, ironskin, and rage. Alright so what do these offer? Well the Violence, Destruction, and Rage are all about damage. The Violence adds +2% Damage for each, Destruction offers +10%, and the Rage offers 1%. The Experience and Perception add +1% and +2%, respectively.
A lot of player's will pit these against each other, but the honest truth is that you'll roughly pull the same amount of experience per hour using these implants. Sometimes, combining them can be better in the end.
Creating Your Own Aggro

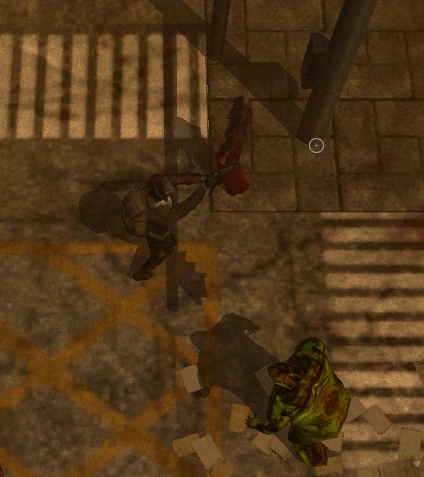
Alright so we're wanting to start our own aggro, you know get that easy one-three million experience in, without fighting a boss or waiting for an Outpost Attack. Well that's all fine and dandy. Now if we look to our right, the same place as any other image on a Wiki, we'll see the beautiful she-devil herself. This little girl is called a 'Siren'. Now what the Sirens do is they scream and cause aggro to start running in, any infected within their range will 'come at you'. That being said, she's a good way to get 'er started. After we've got one of them popping off at the mouth, we'll want to start running the black and shooting, was this does is cause a chain effect in which all of the infected are going to begin chasing you. Once you've finished running the block, we'll pick a corner, any corner without objects blocking you, such as cars, trucks, etc or find a safe wall to use.
You will only get a few minutes of grinding creating your own aggro, so you will need to leave the area or enter the building every 5-8 minutes to create more. Aggro spikes are a rare event but will lead to 10-20 minutes of grinding.
So what is Circle-Grinding?
Essentially circle-grinding is the idea of having the entire mass of infected consistently piling into the corner you're in, and you walk circles around them shooting them. This method can be done with any weapon, you simply have to learn the technique of dodging. Usually this is effective depending on the weapon that you use, Explosives, Shotguns, HMG's, are typically the best types of weapons for circle-grinding.
Using Walls to Safely Grind With Explosives
It is a common tactic to use walls to safely grind as the zombie AI is not smart enough to walk around obstacles. This method only results in half of the experience you should be expecting from circle grinding but is much safer and cheaper since it does not require a speed boost. A very popular place to do this is at gas stations. They have a wall that wraps around the back that covers most directions, however, from time to time a few zombies will spawn inside.
Keep in mind that there is anti-cheat for AFK grinding. You must move your Character every couple of seconds or the game will deny you experience.
Using Boss Aggro

Arguably the best way of grinding is via Boss Cycles. See the Boss Cycles reset every hour on the thirty-five minute mark. So let's say you login at 6:35, that's a new Boss Cycle that just started, and at 7:35 it will end and another new one will start. Basically you get a full hour with the bosses, infected, and enough ammo to blow them all away, hopefully. Now as far as this goes, we've discussed preparation and implants, so you already know what to do! We even discussed the circle-grind method, which is still what I would suggest with Boss Cycles. Typically when you do a Boss Cycle, you'll run the block fighting off the Boss, after a while you'll actually lose the aggro and it'll be you and them alone together. That being said, kill the boss, grab that loot, grind the cycle, level up! As stated, this is possibly the best way of grinding to date. Boss Cycles will keep on resetting up until void time which occurs 1:35AM-4:35AM Eastern time. Good luck!
Outpost Attacks
Beautiful Outpost Attacks, probably many's favorite way of grinding.
So outpost attacks usually occur every four or so hours. Let's say one started at 7:30, then the next should start around 11:30. These intense battles usually last around half an hour long, and in the end you receive an OA Bonus. This bonus is based off of the amount of experience gained during the OA. There's not much to this that you don't already know, when the Outpost Attack comes on, you go out and grind in the Outpost Block. Typically newer player's prefer to stay around the guards for extra protection, note that this hinders your experience gained. Then more established players will move to a corner which the guards cannot shoot the infected. For Secronom Bunker for example, people usually move to the bottom left or right corners to circle-grind the aggro. During an OA you can expect to gain anywhere between 1-16M dependent on your level, Weapons, knowledge, implants, drugs, and clan boosts.
Clan Boosts, Drugs, and Gold Membership.

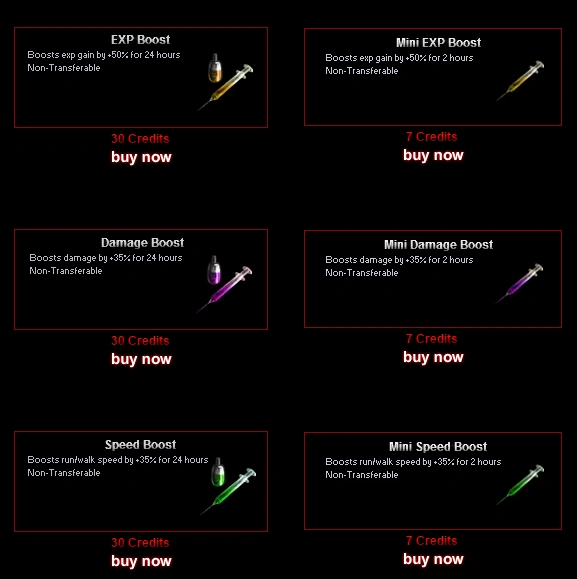
Now we're going to learn about Drugs, Clan Boosts, and the luxurious Gold Membership. The drugs are pretty simple, Exp Boost is a 50% gain in Experience for either two hours, or twenty-four hours. Damage Boost is a 50% gain in Damage inflicted for either two hours, or twenty-four hours. The Speed Boost is 35% gain in speed for either two hours, or twenty-four hours. Please note that these Boosts cost thirty credits for twenty-four hours and seven credits for two hours. That's if you're a Gold Member. If you're not a Gold Member, they are forty and ten respectively.


Getting into the Clan HQ Boosts, there is a lot to cover. It's all self explanatory though, and in this section, we'll only go over the Boosts that will effect grinding. +10% Exp, +10% Damage, and 10% Damage Reduction. As stated, it's self explanatory, the Exp gives you a 10% bonus on gained experience, the 10% Damage inflicts 10% more damage per hit and/or shot. The 10% damage reduction gives you 10% damage reduction to any hits that are inflicted on you. Now for the Gold Membership. The Gold Membership is a great product to have and helps you a great deal with looting, grinding, etcetera. For the purposes of these tips and tactics we'll speak on the grinding aspect. With a Gold Membership you'll actually gain x2 experience for any experience you've gained. So if you gain 1,000 experience through killing infected, in theory, you're actually gaining 2,000 due to having a Gold Membership.


Wastelands INTRODUCTION
The Wasteland is a very challenging and rewarding area for grinding whether you're a casual player or serious grinder. The Wasteland was a recently added expansion to the inner city under Precinct 13 roughly one year ago (2016) that was said to be created for “elite” players of the Dead Frontier community. As for the infected, aggro is much more intense than any other area in the game and it is said that Wasteland aggro is never-ending. The infected in the Wasteland are also much stronger and resilient than any infected at other outposts. Most of the infected at the Wasteland will damage most high end armors

in one hit if not break them entirely. The only game based requirement to enter the Wasteland is for you to be level 75 but, the recommended requirement is to have at least a Tatakau Reactive armor and a GAU or Wraith Cannon whether its unlimited or not. Although unlimited ammo variants of those weapons are better to have, Ghost Ammo would be sufficient due to the extreme costs of ammo at Precinct 13. It is said that the Wasteland will generate 25% more experience than any other area in the game when you are grinding and 8x the chance to loot a 120 (But who cares about that, this is the grinding section of tips and tactics!). Upon entering the area with the wasteland entrance, you will see an option to walk down into an open-fenced area with distinctly different ground features than normal. The first two blocks (areas) of the Wasteland have nerfed aggro compared to blocks farther in. If you want the maximum amount of aggro you will have to go three blocks deep, however the first two blocks make very good practice for deeper areas.
WASTELAND GRINDING TIPS
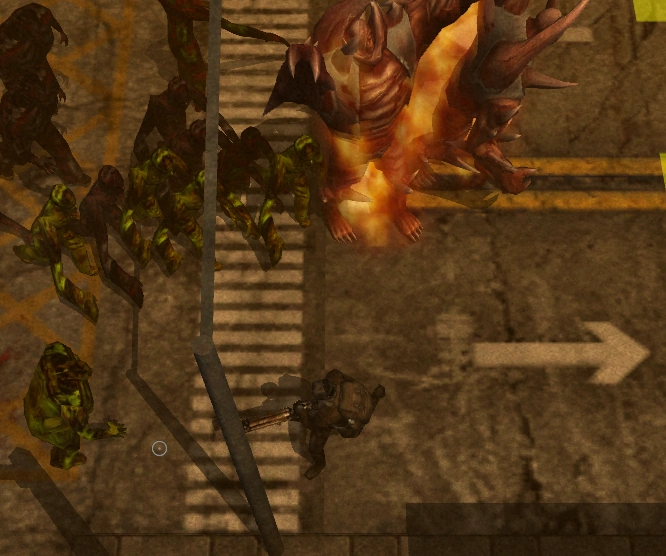
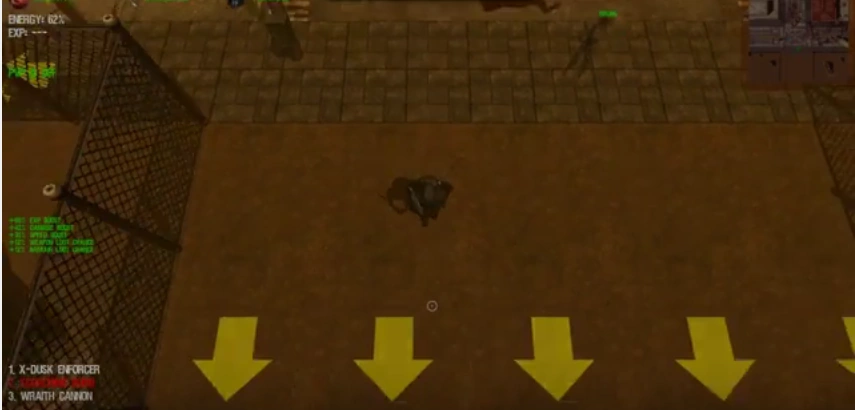
Unlike other outposts where circle grinding is the most efficient and safest way to grind, Wasteland has a much different way of grinding. Grinding in the Wasteland is normally done three blocks deep at the least because of the aggro nerf mentioned in the Wasteland Introduction. To grind in the Wasteland you must chose a block that has the least amount of obstacles so when you're grinding you don't get stuck on any rocks or cars. You also want to keep using that block if possible so that you can memorize any obstacles without having to look away to check your map which possibly opens you up to getting hit. The general way of grinding in the Wasteland is to make a massive square around the block. You want to stick close to the edges but not to close to get yourself pinned against the side as you will be back peddling into aggro for the first few minutes of grinding. Upon entering deeper areas in the Wasteland aggro will be coming at you from every direction, starting your grind will be the hardest part of the Wasteland. When you enter the area whether it be the left or right side you will want to start back peddling down towards the bottom of the area while sticking rather closely to the edge of the map while avoiding getting hit. Once you hit the bottom of the area you will want to start going to the left or right depending on where you started. For instance, if you entered on the top left, you will want to run straight to the bottom of the area then when you see the yellow arrows you want to start heading to the right. Then continue running around the block making a virtual square around the area while backpeddling. Once you've made a few runs around the block you'll notice that aggro will only come from one direction with the occasional zombie from behind, now the easy part begins. Once the aggro is contained to one direction, you can backpeddle without sprinting until the infected get close to you with ease while maintaining the square grinding pattern. Although the Wasteland is rumored to have never-ending aggro, if you backpeddle to much you will essentially out run the aggro and only mothers will spawn. If this happens, you can either leave the area and come back to restart the process or grind the mothers until the aggro returns.
Wasteland Implant use
As mentioned above, Implants can be very helpful to you and your experience gain if used right. This is especially important in the Wasteland since your experience rate is already 25% more, boosting it higher will only help you in the long run if you're trying to get to level 220 or 325. Since you have to be 75 to enter the Wasteland, you will only have 4 implant slots (unless you are 120+) so you want to use your Implant space wisely. It is preferred that you have all the Limited Edition Implants that boost experience/damage gain if you intend on going to the Wasteland, but it's not a requirement. If you don't however have Limited Edition Implants, don't fret! You can always buy the Destruction Implant (Limited Edition) as its the only transferable LE Implant, but unfortunately the others have come and are long gone from the credit shop. With the Destruction Implant, the last 3 implant slots will be best used by equipping Violence Implants (+2% damage) or Perception Implants (+2% Experience), whichever you prefer. Both damage and experience implants tend to do the same thing in the Wasteland so either will work fine, but if you are level 120+ and have more Implant slots then you might want to start mixing them up, such as 4 exp and 4 damage and then test them alone to see which combination gets you the maximum amount of experience per hour.